
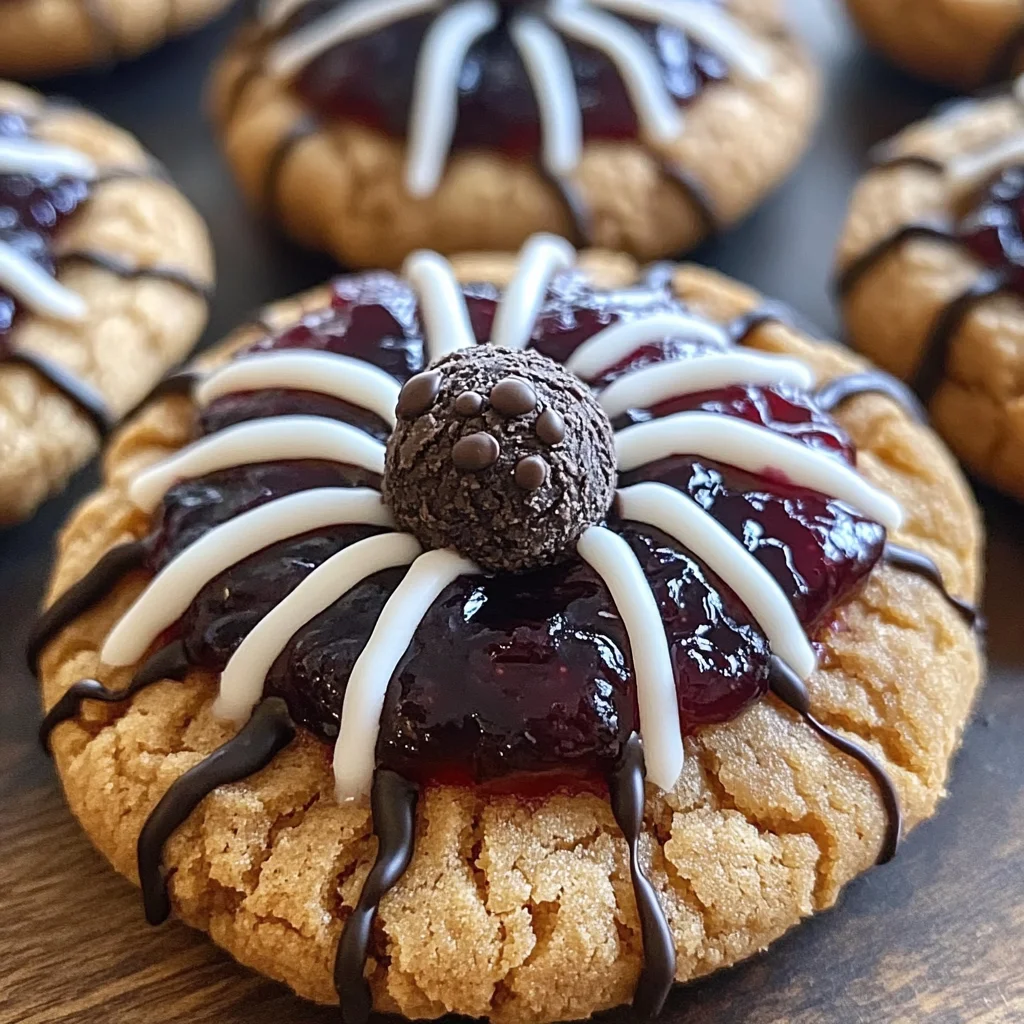
Peanut Butter Spider Cookies are a delightful twist on traditional cookies, perfect for Halloween or any spooky occasion. These Spider Cookies combine the rich flavor of peanut butter with a sweet jam filling and whimsical chocolate truffle spiders on top, making them a hit with kids and adults alike. They are not only fun to make but also look great on any dessert table.
Why You’ll Love This Recipe
- Spooky Fun: These cookies are perfect for Halloween parties and kid-friendly gatherings, bringing joy and creativity to your baking.
- Delicious Flavor: The combination of peanut butter and jam creates a deliciously sweet and nutty flavor that everyone will love.
- Easy to Make: With simple ingredients and straightforward steps, these cookies are perfect for bakers of all skill levels.
- Versatile Treats: Feel free to customize the jam filling or use different toppings to suit your taste or occasion.
- Kid-Friendly Activity: Making these cookies can be a fun activity for kids, allowing them to get creative with decorating their spider cookies.
Tools and Preparation
Before you start baking your Spider Cookies, gather the necessary tools for an efficient cooking experience.
Essential Tools and Equipment
- Food processor
- Baking tray
- Baking paper
- Mixing bowl
- Measuring cups and spoons
- Cooling rack
Importance of Each Tool
- Food processor: It helps quickly mix the cookie dough, ensuring a smooth consistency without much effort.
- Baking tray: A good quality tray ensures even baking, helping your cookies turn out perfect every time.
- Cooling rack: This allows your cookies to cool evenly after baking, preventing sogginess.
Ingredients
Peanut Butter Spider Cookies are a spooky yet delicious treat, featuring peanut butter cookies filled with jam and topped with chocolate truffle spiders.
For the Cookie Dough
- 1 large egg
- 225g coconut sugar
- 180g smooth peanut butter
- 60g dairy-free butter
- 1 tsp vanilla essence
- 185g plain flour
- ½ tsp baking soda
- ½ tsp baking powder
- 2 Tbsp milk (optional, for dough consistency)
For the Toppings
- 15 tsp boysenberry jelly or any jam of choice
- 15 chocolate truffle balls
- 1 white writing icing tube
- 30 black sesame seeds
- 1 black writing icing tube
How to Make Spider Cookies
Step 1: Preheat the Oven
Preheat the oven to 180°C and line a large baking tray with baking paper.
Step 2: Prepare the Dough
In a food processor, combine all ingredients except for the toppings (jelly, truffles, icing tubes, and sesame seeds) and blitz until a dough forms. If the dough is too dry, add milk 1 tablespoon at a time until it sticks together.
Step 3: Shape the Cookies
Roll the dough into balls weighing about 45g each. Place on the lined baking tray and use your finger to press a hole in the center of each ball. Repeat with remaining dough.
Step 4: Bake the Cookies
Bake for 15 minutes, then remove from the oven and transfer cookies to a cooling rack. While still warm, reshape the holes using the back of a teaspoon if needed.
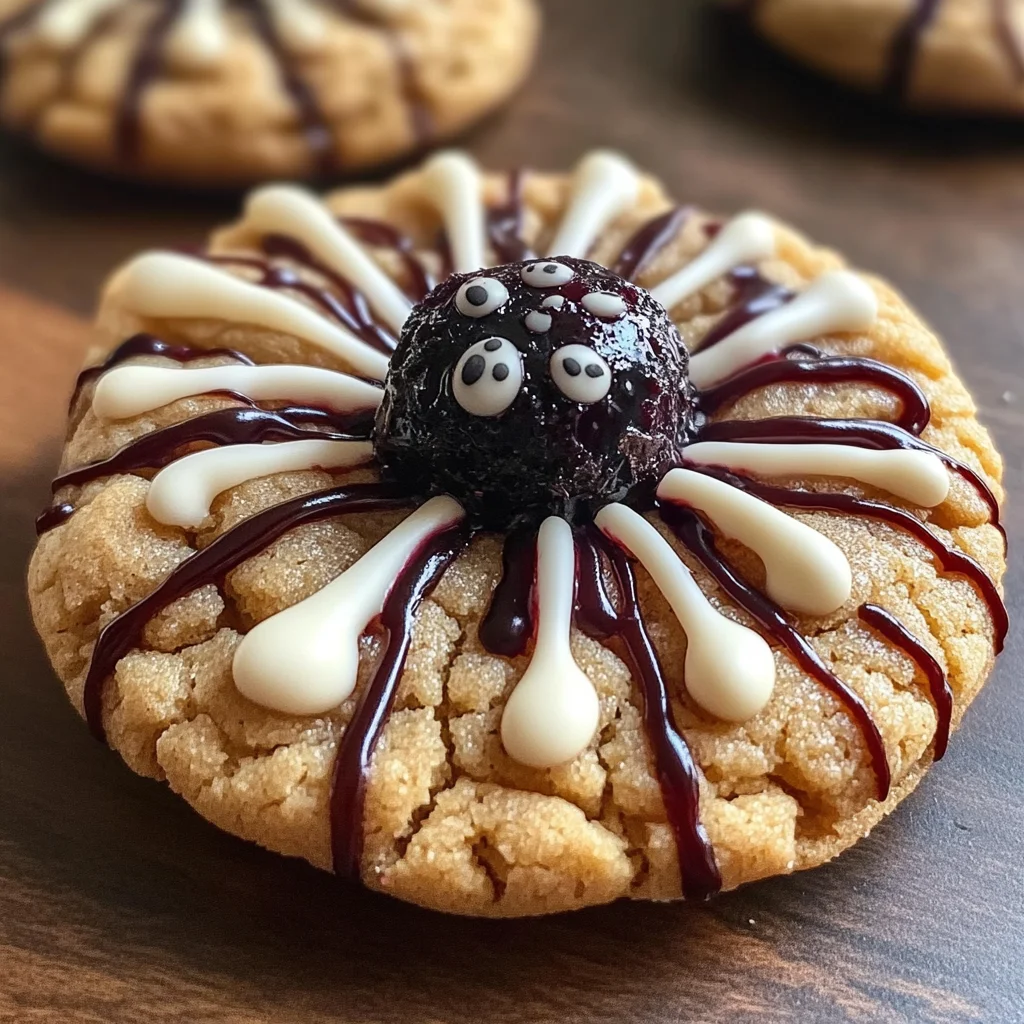
Step 5: Add Jelly Filling
Once cooled, fill each cookie with a heaped teaspoon of jelly or jam. Place a chocolate truffle on top of the jam.
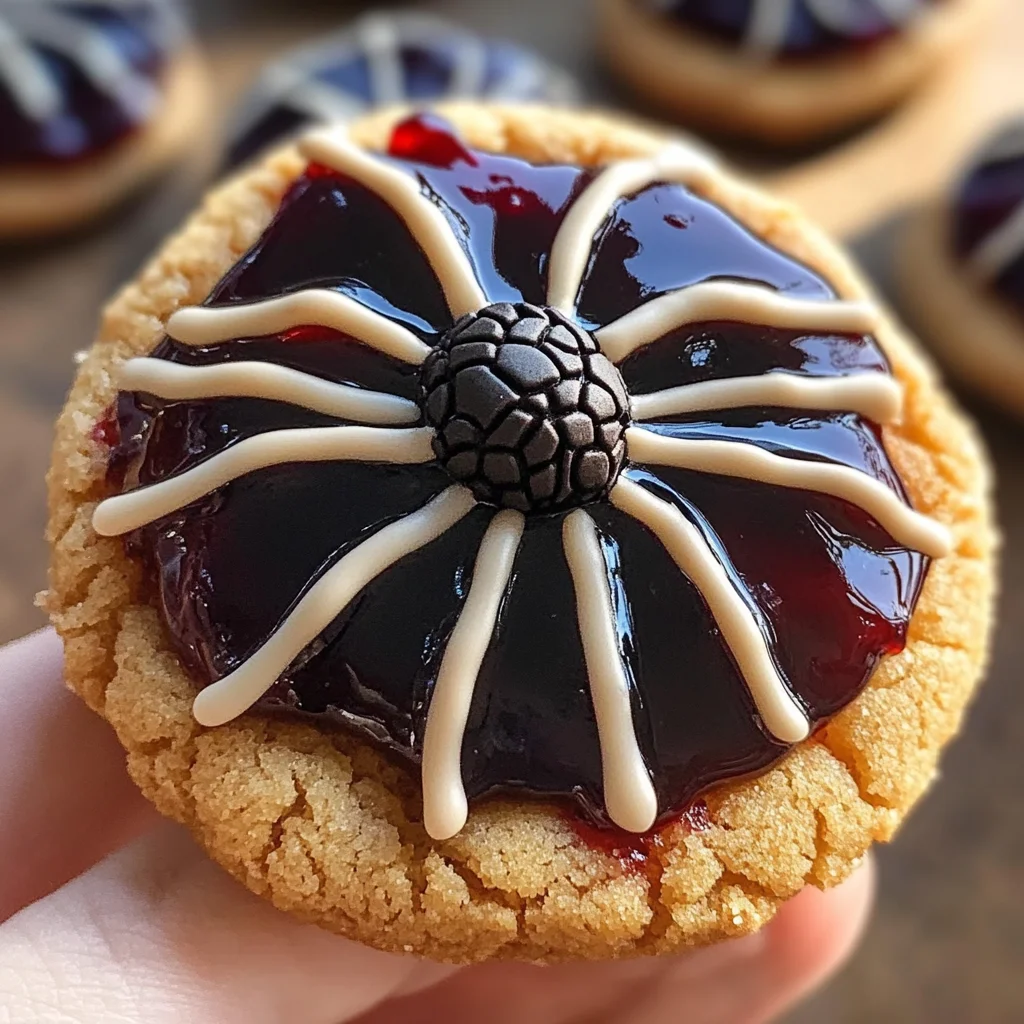
Step 6: Decorate with Icing
Using the white writing icing, pipe two small dots on each truffle for eyes. Place a black sesame seed in the center of each dot for pupils.
Step 7: Create Spider Legs
Use the black writing icing to pipe four lines on each side of the cookie to create spider legs.
How to Serve Spider Cookies
Spider Cookies are not only fun to make but also delightful to serve. These spooky treats can be enjoyed in various ways, making them perfect for Halloween gatherings, parties, or just a fun family dessert.
On a Halloween-Themed Platter
- Arrange Spider Cookies on a decorative platter adorned with cobwebs and plastic spiders for a festive touch.
With a Glass of Milk
- Serve each cookie with a glass of cold milk. The creaminess complements the peanut butter flavor beautifully.
As Party Favors
- Package individual Spider Cookies in clear bags tied with orange ribbons. They make great Halloween treats for guests to take home.
Alongside Ice Cream
- Pair these cookies with vanilla or chocolate ice cream for an indulgent dessert experience that kids will love.
At a Cookie Decorating Station
- Set up a station where kids can add their own toppings or decorate additional cookies, allowing everyone to get creative with their Spider Cookies.
How to Perfect Spider Cookies
To ensure your Spider Cookies turn out perfectly every time, follow these handy tips for best results.
-
Use Room Temperature Ingredients: This helps the dough blend smoothly, creating a better texture in your cookies.
-
Don’t Overbake: Keep an eye on the cookies while they bake. Remove them when they are slightly golden; they will continue to firm up as they cool.
-
Adjust Dough Consistency: If your dough feels too crumbly, adding milk gradually can help achieve the right texture for rolling.
-
Experiment with Jams: While boysenberry jelly is fun, try using raspberry or strawberry jam for different flavors that pair well with peanut butter.
-
Chill the Dough: For even better flavor and texture, chill your dough for 30 minutes before baking. This can enhance the taste of your cookies.
Best Side Dishes for Spider Cookies
Spider Cookies can be complemented by several delightful side dishes that enhance their spookiness and overall flavor profile. Here are some great options:
-
Pumpkin Soup: This warm and creamy soup pairs well with sweet desserts and adds to the autumn theme.
-
Apple Slices with Caramel Dip: Crunchy apples dipped in caramel provide a lovely contrast to the soft texture of cookies.
-
Cheese Platter: A selection of cheeses adds sophistication and balances out the sweetness of the Spider Cookies.
-
Fruit Salad: A fresh fruit salad brings brightness and freshness to your dessert table, complementing rich flavors.
-
Chocolate Pudding Cups: Serve small cups of chocolate pudding topped with whipped cream for an extra treat alongside your cookies.
-
Mini Pumpkin Muffins: These sweet muffins will resonate well with the fall season and pair nicely with peanut butter flavors.
-
Nut Mix: A bowl of mixed nuts provides crunch and protein, making it a great savory counterpart to sweet desserts.
-
Hot Cocoa: A cozy cup of hot cocoa enhances the experience during colder weather and is especially enjoyable with these cookies.
Common Mistakes to Avoid
When making Spider Cookies, it’s easy to stumble into a few common pitfalls. Here are some mistakes to watch out for:
-
Skipping the Cooling Step – It’s tempting to fill your cookies right after baking, but skipping the cooling phase can lead to a messy jam-filled disaster. Allow your cookies to cool completely before adding the jelly.
-
Using the Wrong Type of Jam – Not all jams are created equal! Using a jelly that’s too runny can cause your filling to leak out. Choose a thick jam like boysenberry for the best results.
-
Overbaking the Cookies – Overbaked cookies become dry and crumbly. Keep an eye on your cookies and remove them from the oven as soon as they’re lightly golden for optimal texture.
-
Neglecting Dough Consistency – If your dough feels too dry, it won’t hold together well. Always add milk gradually until the dough is moist enough but not sticky.
-
Ignoring Decoration Details – The fun part of making Spider Cookies is decorating them! Forgetting to add eyes or legs can take away from their spooky appeal. Take time with these finishing touches for a festive look.
Storage & Reheating Instructions
Refrigerator Storage
- Store Spider Cookies in an airtight container.
- They will last up to 5 days in the fridge, keeping them fresh and tasty.
Freezing Spider Cookies
- You can freeze unfilled cookies for up to 3 months.
- Place them in a freezer-safe bag or container, separating layers with parchment paper.
Reheating Spider Cookies
- Oven – Preheat your oven to 150°C (300°F) and warm for about 5-7 minutes.
- Microwave – Heat each cookie for about 10-15 seconds on medium power.
- Stovetop – Place cookies in a skillet over low heat, covering with a lid for about 2 minutes until warmed through.
Frequently Asked Questions
Here are some common questions about making Spider Cookies:
What are Spider Cookies?
Spider Cookies are delightful peanut butter cookies topped with jam and decorated like spiders, perfect for Halloween parties!
How long does it take to make Spider Cookies?
The total time required is approximately 35 minutes—20 minutes of preparation and 15 minutes of baking.
Can I customize my Spider Cookies?
Absolutely! Feel free to use different types of jam or chocolate truffles depending on your taste preferences.
Are Spider Cookies kid-friendly?
Yes! These fun treats are great for kids and can be made together as a family activity during Halloween.
How do I store leftover Spider Cookies?
Store any leftover cookies in an airtight container in the refrigerator for up to five days or freeze them for future enjoyment.
Final Thoughts
Making Spider Cookies is not just about enjoying a delicious treat; it’s also about having fun in the kitchen! This recipe is versatile, allowing you to customize flavors and decorations as you like. Whether you’re hosting a Halloween party or just want a spooky snack, give these cookies a try—you won’t be disappointed!
Peanut Butter Spider Cookies
- Total Time: 35 minutes
- Yield: Makes approximately 15 cookies 1x
Description
Indulge in the spooky spirit of Halloween with these delightful Spider Cookies! Combining the creamy richness of peanut butter with a sweet jam filling, these whimsical treats are topped with charming chocolate truffle spiders. Perfect for parties, family gatherings, or just a fun baking activity with kids, these cookies are not only easy to make but also visually captivating. With each bite, experience a blend of nutty sweetness and playful creativity that will leave both kids and adults wanting more. Gather your ingredients and get ready to impress your guests with this festive treat!
Ingredients
- 1 large egg
- 225g coconut sugar
- 180g smooth peanut butter
- 60g dairy-free butter
- 1 tsp vanilla essence
- 185g plain flour
- ½ tsp baking soda
- ½ tsp baking powder
- 15 tsp boysenberry jelly (or jam of choice)
- 15 chocolate truffle balls
- White and black writing icing tubes
- Black sesame seeds
Instructions
- Preheat your oven to 180°C and line a baking tray with baking paper.
- In a food processor, combine all cookie dough ingredients except for the toppings and blend until smooth. If needed, add milk gradually for desired consistency.
- Roll the dough into balls (about 45g each) and press a hole in the center of each on the lined tray.
- Bake cookies for 15 minutes until slightly golden. Allow them to cool completely on a rack.
- Once cooled, fill each cookie center with jam and place a chocolate truffle on top.
- Decorate using white icing for eyes and black icing for spider legs.
- Prep Time: 20 minutes
- Cook Time: 15 minutes
- Category: Dessert
- Method: Baking
- Cuisine: American
Nutrition
- Serving Size: 1 serving
- Calories: 175
- Sugar: 12g
- Sodium: 90mg
- Fat: 8g
- Saturated Fat: 2g
- Unsaturated Fat: 6g
- Trans Fat: 0g
- Carbohydrates: 22g
- Fiber: 1g
- Protein: 4g
- Cholesterol: 10mg
Keywords: Experiment with different types of jam for unique flavors. Chill the dough for enhanced texture before baking. Customize decorations to match your Halloween theme.